2026.01.06
h 函数 -> Vue 的虚拟节点创建机制
回顾渲染器
先回顾一下之前的代码:
import { createRenderer, h } from 'vue'
import { renderOptions } from '../dist/vue.esm.js'

const renderer = createRenderer(renderOptions)
const vnode = h('div', {
  onClick() {
    console.log('click')
  },
  id: 'node',
  a: '1'
}, 'hello world')

renderer.render(vnode, app)
我们将 DOM 操作相关的 API 放到了 runtime-dom 中,因为它的职责就是提供浏览器环境下的 DOM 操作能力。
同时,我们还用到了 createRenderer,它不能单独工作,需要配合 DOM 操作方法。
createRenderer 的返回值
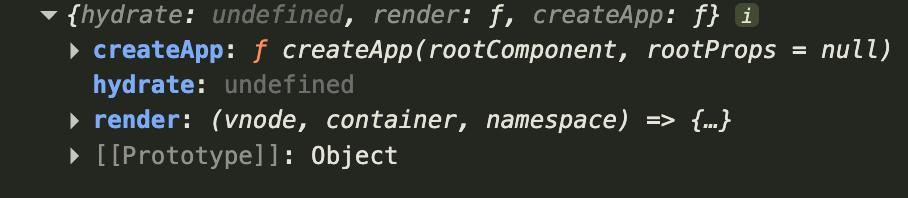
createRenderer 返回一个对象,包含:
- render:用于将虚拟节点渲染到容器中
- createApp:用于创建 Vue 应用实例(即我们常用的
createApp(rootComponent).mount(container))
通过这种设计,Vue 实现了平台无关的渲染能力。
虚拟节点的创建
render 函数接收两个参数:vnode 和 container。那么 vnode(虚拟节点)是如何创建的呢?
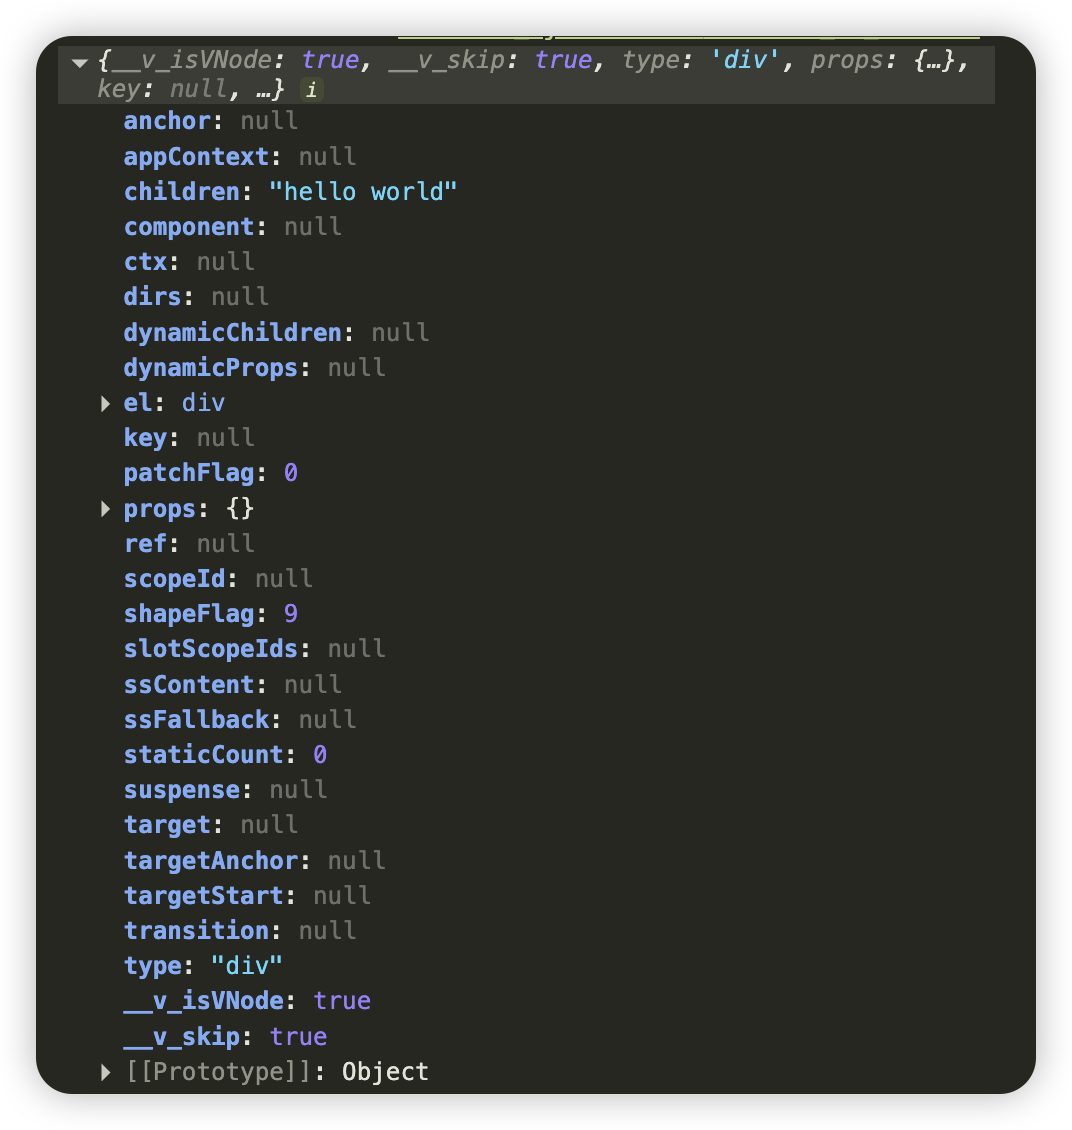
h 函数的使用方式
h 函数是 Vue 中创建虚拟节点的便捷方法,它支持多种参数形式:
// ========= 两个参数 =========

// 1. 第二个参数为文本子节点
const vnode1 = h('div', 'hello world')

// 2. 第二个参数为数组子节点
const vnode2 = h('div', [h('span', 'hello'), h('span', 'world')])

// 3. 第二个参数为单个子节点
const vnode3 = h('div', h('span', 'hello'))

// 4. 第二个参数为 props
const vnode4 = h('div', { class: 'container' })

// ========= 三个参数 =========

// 5. props + 文本子节点
const vnode5 = h('div', { class: 'container' }, 'hello world')

// 6. props + 单个子节点
const vnode6 = h('div', { class: 'container' }, h('span', 'hello'))

// 7. props + 多个子节点
const vnode7 = h('div', { class: 'container' }, h('span', 'hello'), h('span', 'world'))

// 8. props + 数组子节点(效果同上)
const vnode8 = h('div', { class: 'container' }, [h('span', 'hello'), h('span', 'world')])
h 函数与 createVNode
在 Vue 中,创建虚拟节点实际上有两个函数:
- createVNode:真正创建虚拟节点的函数
- h:对
createVNode进行参数归一化处理的便捷函数
为什么需要两个函数?
h 函数的作用是参数归一化,让我们可以用多种方式调用。从上面的示例可以看出:
- 第二个参数可以是子节点,也可以是 props
- 子节点可以是字符串、数组或单个虚拟节点
- 可以传递两个参数,也可以传递三个或更多参数
这些灵活的调用方式最终都会被归一化为标准的 createVNode 调用。
h 函数的实现
import { isArray, isObject } from '@vue/shared'

/**
 * h 函数的主要作用是对 createVNode 做参数归一化
 * 支持多种调用方式,最终都转换为标准的 createVNode 调用
 */
export function h(type, propsOrChildren?, children?) {
  const l = arguments.length

  if (l === 2) {
    // 两个参数的情况
    if (isArray(propsOrChildren)) {
      // h('div', [h('span', 'hello'), h('span', 'world')])
      return createVNode(type, null, propsOrChildren)
    }

    if (isObject(propsOrChildren)) {
      if (isVNode(propsOrChildren)) {
        // h('div', h('span', 'hello'))
        return createVNode(type, null, [propsOrChildren])
      }
      // h('div', { class: 'container' })
      return createVNode(type, propsOrChildren, children)
    }

    // h('div', 'hello world')
    return createVNode(type, null, propsOrChildren)
  }
  else {
    // 三个或更多参数的情况
    if (l > 3) {
      // h('div', { class: 'container' }, h('span', 'hello'), h('span', 'world'))
      // 将第三个参数及之后的所有参数收集为 children 数组
      children = [...arguments].slice(2)
    }
    else if (isVNode(children)) {
      // h('div', { class: 'container' }, h('span', 'hello'))
      // 单个子节点也转换为数组
      children = [children]
    }

    return createVNode(type, propsOrChildren, children)
  }
}

/**
 * 判断是否为虚拟节点
 */
function isVNode(value) {
  return value?.__v_isVNode
}
createVNode 的实现
createVNode 是真正创建虚拟节点对象的函数:
/**
 * 创建虚拟节点
 * @param type 节点类型(标签名或组件)
 * @param props 节点属性
 * @param children 子节点
 */
function createVNode(type, props?, children?) {
  const vnode = {
    __v_isVNode: true, // 虚拟节点标识
    type, // 节点类型
    props, // 节点属性
    children, // 子节点
    key: props?.key, // 用于 diff 优化的 key
    el: null, // 对应的真实 DOM 元素
    shapeFlag: 9 // 节点形状标识(详见后面章节)
  }

  return vnode
}
关于 shapeFlag
在上面的代码中,我们暂时将 shapeFlag 设置为 9。这个属性用于标识虚拟节点的类型和特征,它使用位运算来存储多个值。

通过设置 shapeFlag: 9,虚拟节点可以被正确渲染。
总结
通过本章节,我们了解了:
- h 函数:提供灵活的参数形式,让创建虚拟节点更便捷
- createVNode:真正的虚拟节点创建函数,返回标准的虚拟节点对象
- 参数归一化:h 函数将各种参数形式统一转换为 createVNode 的标准调用
- 虚拟节点结构:包含 type、props、children、key、el 等核心属性
这种设计模式在 Vue 中随处可见:提供灵活的 API 给开发者,内部则使用统一的标准格式处理。